.
How To Use Carbon Filters In Your Cannabis Grow Room
Growing weed at home can be a smelly business. Although cannabis buds smell delightful, such skunky terpenes can also give your hobby away to nosey neighbours. Learn how to use carbon filters to remove suspicious smells from the air and keep you grow private. Then, follow our step-by-step guide to learn how to make your own carbon filter at home.
Contents:
Growing cannabis indoors comes with a large set of advantages. You’ll have complete control over temperature, humidity, water, and lighting. Such command over your growing space will enable you to boost plant health, optimise yields, and keep pathogens and pests at bay.
However, growing indoors comes with a downside, too. Things can get very, very smelly. You might get used to the pleasant and floral odour, only to be reminded of the intensity of the terpenes when having guests over for dinner. While exposing friends and family to the signature scent of cannabis might not be an issue, landlords and nosey neighbours are an entirely different story.
You can keep your indoor growing operation completely private by removing skunk-y smells from the equation. After looking for a solution to this issue for decades, cultivators finally stumbled across a piece of kit that works remarkably well: carbon filters. Find out how these stealthy devices can eradicate obvious aromas and keep your cannabis grow clandestine.
What are Carbon Filters?
Carbon filters play an important role in any indoor cultivation environment. Aside from growing tents, these devices are also found in air conditioning and furnaces where they help to capture contaminants while allowing clean air to pass through. When it comes to growing cannabis, the “contaminants” in focus are aromatic terpenes. Although these pleasant molecules determine the taste and effects of cannabis, they also unleash a mighty smell!
These filters feature layers of activated carbon, a form of carbon treated to features small, low volume pores. These small holes vastly increase the surface area of the filter, which provides much more space for chemical reactions and filtration to take place.
How Carbon Filters Work
Carbon filters use the principle of adsorption—the adhesion of molecules to a surface—to scrub the terpene-rich air found in grow tents. Because activated carbon possesses a greatly enhanced surface, it serves as the perfect substance for the job. To put things into perspective, a single gram of active carbon features a surface area of 3,000m²!
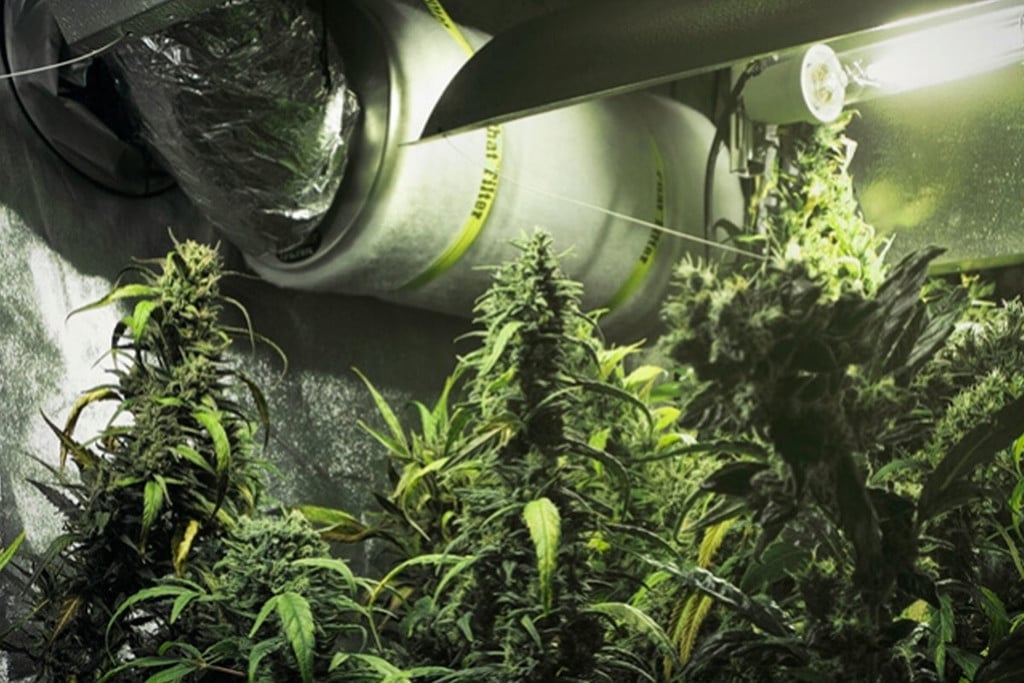
To ensure terpenes pass through the filter, growers need to create a vacuum in the grow space. Exhaust fans that match the requirements of the carbon filter in use will drag air through the device and out of the grow tent. Adequate suction will force all of the terpene-rich air through the filter, preventing any from leaking out of the sides of the grow tent.
As the smelly air passes through the filter at the correct speed, the active carbon will capture airborne terpenes while allowing other molecules to pass through, preventing the obvious smell of cannabis from seeping out of the grow tent. By attaching ducting to the external outlet of the exhaust fan, growers can direct odourless air out of the nearest window or ventilation shaft.

Where to Put a Carbon Filter in a Grow Room
Carbon filters typically suspend just below the ceiling of a grow tent. Use the following step to position them perfectly:
- Connect your filter to an exhaust fan that features a compatible CFM (cubic feet per minute) and duct diameter.
- Secure the two devices firmly together using an airstrip or duct tape.
- Hang the setup from the roof bars of the grow tent, as high up as possible.
- Connect ducting to the outlet of the exhaust fan and secure with duct tape.
- Feed the opposite end of the ducting through the designated hole on the side of your grow tent.
- Position the ducting outlet near an open window or ventilation shaft.
How to Build Your Own Carbon Filter
Hydroponic shops, hardware shops, and e-commerce websites all offer a wide range of effective carbon filters. However, making your own can reduce costs, and you’ll gain a skill that will come in handy during future growing projects. Follow the tips below to secure the materials you’ll need, and learn how to put them together.
Materials
As a relatively easy task, you’ll be able to obtain all the materials you need to build your own carbon filter after one trip to the DIY shop and a brief look around your house. Check the following items off your list as you go:
A) Roll of aluminium screen or chicken wire
B) PVC cleanout cap and PVC adaptor of the same diameter
C) Dryer vent hose
D) Roll of duct tape
E) Role of quilt batting
F) Laundry basket (ideally one with a lid)
G) Activated carbon


Step-by-step Guide
Now that you have all of your materials place them on a large clean work area to begin construction. Use the following steps to create your own working carbon filters out of these random bits and pieces.
- Create a tube out of your chicken wire or aluminium screen that matches the diameter of the PVC cleanout cap.
- Insert the cap into one end and secure in place using duct tape.
- Place the tube into the basket with the open end facing upwards, and trim the tube down so it’s the same height as the rim of the basket.
- Remove the tube from the basket. Insert the PVC adaptor into the open end, and seal the two objects securely in place with duct tape.
- Fold the quilt batting in two to double its thickness before wrapping two layers around the tube—duct tape everything in place.
- Fold more batting in the same manner, and form a double layer around the walls of the laundry basket, securing with duct tape.
- Place the tube into the centre of the basket with the PVC adaptor facing upwards. Add more batting to the walls until a 3cm gap remains between the tube and the basket walls.
- Fill in the gap with activated carbon.
- Cover the top of the basket with more double-layered batting, and cut out a hole over the PVC adaptor.
- Attach one end of the dryer hose to the cleanout cap, and attach the other end to your exhaust fan.


When Should You Change a Carbon Filter?
Congratulations, you’ve made your own carbon filter! Not only will you save money, but you’ll also be able to help fellow growers look after their wallets and become more independent cultivators. Hang your DIY filter up in the same way and begin filtering terpenes!
All carbon filters have a set lifespan. Once the surface of the active carbon builds up and becomes clogged, it will lose its ability to absorb more molecules. How long until that happens, you wonder? Well, on average, your DIY filter should keep the air clean for around two years.
However, a sudden increase in aromatic terpenes outside of your grow tent will also indicate the expiration date has come. When that happens, simply remove the lid and exchange the spent carbon with a fresh load. Happy growing!


