Amount exceeded

4.8 out of 5 based on 43040 reviews


.

Learn how to clean a grow tent to boost plant health, prevent pests, and improve yields. This guide covers daily, weekly, and monthly maintenance, deep cleaning methods, and the best tools to use. Discover tips for disinfecting, dealing with mould or pest infestations, and keeping your tent in top shape throughout the grow cycle.
In a world of soil science, F1 hybrids, and terpenes, the topic of cleaning certainly isn’t the most exciting. However, developing a consistent cleaning regimen in your grow tent will help you become a better cultivator, avoid pests and diseases, and unlock more consistent results.
In this guide, you will learn the best way to clean a grow tent on a daily, weekly, and monthly basis using easy-to-find products like bleach, hydrogen peroxide, and vinegar.
The cleaner your grow tent, the lower the chances of facing pesky pests, pathogens, and mould. Increased hygiene reduces the spread of bacteria and fungal spores that can damage cannabis roots, leaves, and flowers.
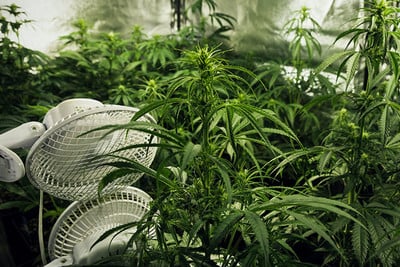
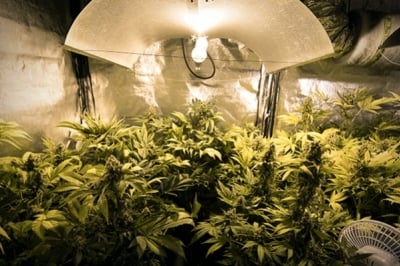
Weed grow tents are highly controlled environments, allowing growers to carefully tailor variables such as lighting and temperature. However, they require frequent cleaning and maintenance to operate optimally.
Get behind on your cleaning duties, and you’ll find that a buildup of dust starts to impact your results by blocking light, while an increase in microbes increases the odds of plant diseases. Common issues caused by uncleanliness include diseases such as powdery mildew, pests including aphids and spider mites, and abiotic (non-living) conditions such as salt buildup in the soil.
Ultimately, keeping things clean will benefit plant health and yields. The key advantages of keeping your grow tent hygienic include:
Starting out with a clean grow tent will drastically reduce the chances of pest and pathogen problems. Prevention is always superior to a cure. Before getting your grow tent going again, thoroughly clean it between each growing cycle.
Of course, this becomes much more crucial if you’ve just spent weeks dealing with unwelcome critters and diseases. However, a deep clean will help to minimise any risk, even if your tent is fresh out of the box.
But you don’t need to take the same approach in every scenario. Naturally, new grow tents require less cleaning than used ones. While you might be tempted to unbox a new tent and put it to work straight away, cleaning it beforehand will help to reduce the chances of problems later down the line.
Check out the differences involved in cleaning new and used grow tents below.
New grow tents might seem entirely clean, especially those transported in airtight plastic packaging. However, they aren’t completely sterile. Microscopic factory residue, dust, and spores are likely nestled away in the nooks and crannies.
Before using a new tent, simply wipe down the ceiling, walls, and floor with antibacterial wipes. Give the floor a good sweep after your cleaning session to remove any dust you might have introduced.
Use a brush to go over the zippers, seams, and hard-to-reach places that could harbour dust particles, spores, and other contaminants.
Used tents require a bit more work, especially if you experienced pathogen or pest problems during the previous growing cycle. As opposed to a light clean, you’ll need to fully disinfect your grow tent. Spores, viruses, and bacteria are microscopic and can cling to surfaces that look squeaky-clean to the naked eye. Take action now to save yourself a lot of potential trouble later on.
Deep cleaning involves the application of different chemical agents, from bleach and hydrogen peroxide to natural alternatives such as vinegar. Keep reading to discover their benefits and uses.
Past a general wipe-down of your tent itself, you should also strive to keep your individual pieces of equipment clean. Not only can they serve as potential vectors of disease, but keeping them in tip-top shape will enhance their performance.
Each component of your grow tent requires a unique cleaning approach to maintain efficiency and longevity. Below, we’ll break down the best methods for cleaning critical grow tent parts.
The tent fabric and reflective walls play a significant role in maximising light efficiency and maintaining a controlled growing environment. Over time, dust, algae, and other residues can accumulate, reducing reflectivity and creating a breeding ground for mould and bacteria.
To clean the tent fabric and reflective walls, use a mild soap solution mixed with warm water on new tents. On older tents, opt for some of the harsher chemicals listed below. A soft cloth or sponge works best to gently wipe down all interior and exterior surfaces.
After cleaning, ensure that all surfaces are completely dry before reassembling your grow setup. Any remaining moisture can lead to mould growth, which can negatively impact plant health.
To speed up drying, use an oscillating fan or leave the tent open for proper air circulation. Regular cleaning of the fabric and walls will keep your growing space hygienic and efficient.


The combination of LED grow lights and reflectors is effective at supplying adequate light intensity to cannabis plants. However, the buildup of dust and grime over time can reduce light output, impacting plant growth and productivity.
To clean LED grow lights and reflectors, first turn off and unplug the lighting system to prevent electrical hazards. Using a microfibre cloth, gently wipe away dust and debris from the light surfaces.
For reflectors, follow the same process but take extra care not to scratch the reflective surface. Even minor abrasions can reduce light efficiency.
If a deeper clean is needed, lightly dampen the cloth with a mild detergent solution. Avoid using excess moisture, and allow components to air-dry before reinstalling them.
A properly functioning ventilation system ensures optimal airflow, temperature control, and odour management. Over time, dust and plant debris can clog ventilation components, reducing efficiency and increasing the risk of mould and poor air circulation.
To keep them clean and efficient, start checking and replacing HEPA and carbon filters as needed. Depending on usage, replace them every few months (according to product instructions) to maintain peak performance.
Next, vacuum fan blades and ducting to remove dust accumulation. A handheld vacuum or a damp cloth can help remove stubborn dirt without damaging the equipment. Ensure all connections and seals are intact, as leaks can reduce ventilation efficiency.
Using the right cleaning products ensures a thorough and safe cleaning process that protects both your plants and your equipment. Below, we outline the best cleaning solutions and tools for maintaining a sanitary grow tent.
Disinfectants help eliminate bacteria, mould, and pathogens in your grow tent. Check out some of the most effective options.
As the most potent option, bleach takes no mercy when it comes to microbes. This potent alkaline solution works as an effective disinfectant capable of wiping out bacteria, fungi, and viruses. Make sure to wear gloves when applying bleach. Also, consider wearing eye protection, especially when applying overhead.
Mix 1–3 tablespoons of bleach into 4 litres (one gallon) of water—the greater the concentration of bleach the greater the disinfecting power. Give it a mix and apply it to all of your grow tent surfaces using a sponge or cloth. Allow the surface to remain wet for a couple of minutes while the bleach kills off any microbes before drying all of the surfaces with a towel.

Hydrogen peroxide also lays waste to germs. Even at a concentration of 3%, as found in most solutions available from stores, this substance can wipe out infectious microbes. You can, however, opt to use a 5–10% solution for greater efficacy. Use a cloth to wipe down all of your tent surfaces with this non-toxic disinfectant.
Also note that hydrogen peroxide breaks down into oxygen and water, making it safe for weed plants when administered correctly.

This natural disinfectant helps to prevent mould. While less potent than bleach—and ineffective in the face of certain pathogens—it’s safe for plants and the environment. Use undiluted or mixed with water for light cleaning.
Insect bombs help to remove any traces of insects from your growing room. They are especially useful if you suffered badly from pests during your last grow. Simply remove the lid from an insect bomb to purge out any insects, mites, or other pests.

After applying the chemical agents of your choosing, make sure to rinse and wipe down all surfaces properly. Removing any residues from the growing space will stop them from potentially impacting the health and productivity of your plants.

After applying disinfectants, the use of essential cleaning tools will help to reduce dust, pathogens, and grime throughout the growing cycle. Check out some of the best pieces of kit for the job.
High-efficiency particulate air (HEPA) filters use dense filters to trap microscopic contaminants like dust, pollen, and mould spores, preventing them from being circulated into the growing space. All manner of microbes and dust particles exist in the air outside of your tent.
By running an intake fan without an effective filter, you’re pulling these contaminants directly into your cultivation space.
Designed to remove airborne contaminants, air purifiers use HEPA and activated carbon filters to capture mould spores, dust, and volatile organic compounds (VOCs). Air purifiers maintain air purity between cleanings by continuously filtering out harmful particles that could otherwise compromise plant health.
For the best results, choose an air purifier with a high clean air delivery rate (CADR) and ensure proper placement near ventilation sources.
Unlike traditional cleaning cloths, microfibre cloths have densely packed fibres that trap dust, grime, and bacteria without leaving scratches or streaks. The electrostatic properties of microfibre cloths make them highly effective at lifting contaminants from reflective surfaces, preventing damage to light-reflective walls and equipment.
Protective gloves shield your skin from harsh chemicals, while eyewear prevents accidental exposure to cleaning sprays or airborne particles.
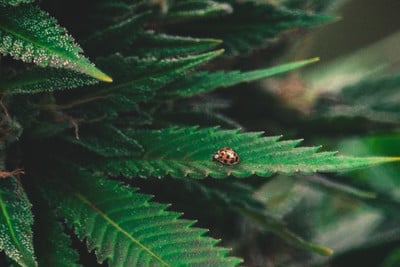
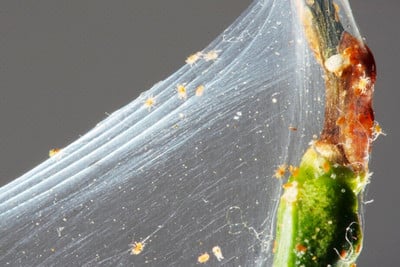
Cannabis pests not only damage plant tissue but also leave behind webbing and excrement. Plus, they act as vectors for bacteria and viruses. Organic pest prevention methods work well at protecting your plants without contaminating them with dangerous chemicals. Some of the top options include:
Now you’re aware of several effective means of keeping your grow tent clean and tidy. Next, you’re going to learn how to put these different approaches into action. We’ll start by outlining some key considerations before moving on to structured daily, weekly, and monthly cleaning routines.
Keep organic material such as soil and plant matter off your floor and tables. These provide good shelter for detrimental critters. We recommend a Shop-Vac when it comes to vacuuming your growing space. These devices feature a HEPA filter that captures fungal spores and bacteria, preventing them from re-entering your space once sucked up.
Integrated pest management (IPM) takes a sustainable approach to dealing with grazing insects. Many growers introduce companion plants, cover crops, and even beneficial insects into their grow tent to help deal with pests without the use of harmful chemicals. Common examples of IPM include:
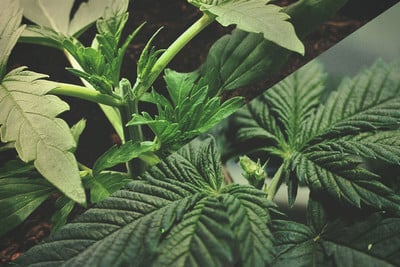
Clones are a great way to bypass germination and get things moving faster. However, you need to keep an eye out for unwanted passengers. You should play the role of a customs officer with every cutting that enters your grow tent.
Inspect each clone before bringing it into your cannabis grow tent. It’s not uncommon to find aphids, mites, and other critters hiding under the leaves or nestled by the nodes. Remove any pests hitching a ride before transplanting clones.
Harvesting is a messy business. As you cut, chop, and trim your buds, you’ll likely litter the floor with soil, sugar leaves, and stems.
Make sure you sweep up all of this debris after harvest time. Insects are attracted to plant matter and organic material as shelter, whereas fungi and bacteria feast on them and multiply.
Your growing medium is a double-edged sword. On the one hand, it is the source of nutrients and beneficial microbial life. On the other, it can harbour diseases and pests that make it hard for cannabis plants to thrive.
There are several approaches you can take when it comes to dealing with your growing medium at the end of a cycle:
Fungi thrive in moist and humid environments with stagnant air. You can decrease the chance of mould formation by using fans to keep the air moving around your grow tent.
Defoliating enables flowing air to move through your canopies more efficiently and minimises mould risk during flowering. A ventilation system consisting of an intake and exhaust will also ensure a fresh supply of carbon dioxide.
Just as the quantity of airflow matters, so does the quality. Some growers (who have the resources to invest) take things a step further with air sanitisers. These units are fitted with filters that prevent spores, bacteria, viruses, and pests from entering the growing space via the air intake. After fully sanitising your space, these devices will help to keep them as clean as possible.
You can also purchase a free-standing air purifier for your grow tent. Although pricey, they are highly effective at removing pathogen particles from the air.

You’re locked and loaded with tips and advice. Now, find out how to implement your newfound knowledge throughout the growing cycle to keep your grow tent clean and free of diseases and debris.
Checking your grow tent daily can feel rewarding while keeping your plants healthy. Use this time as an opportunity to upkeep your space. Cleaning your grow tent a little bit each day helps to decrease the risk of pest and pathogen infestation, and works much more effectively than letting everything build up over a week or two.
As you make your way around the grow space, take a close look at all of your plants. Run your eyes up the stems, along the branches, under the leaves, and around the flowers.
Thoroughly scanning each plant like this can help you detect signs of disease or pests that you’d otherwise miss. As you might imagine, a magnifying glass can be of great assistance here.
If you spot anything during your rounds, make an effort to clean it up straight away. Consider what will attract pests and disease, and fix it up as you go. Prune away dying leaves, and clean up soil spills, dust, and debris from tables and trays.
After you’ve inspected individual plants, turn your attention to the grow tent as a whole. Sweep the floor of dirt and dust the corners. Eliminating potential pest habitats each day works as a simple but effective prevention strategy.
Weekly cleaning of your grow tent or tent consists of more thorough tasks that take a while longer to complete. You don’t need to conduct them every day, but they serve as a vital part of a grow tent hygiene regimen.
Give your equipment, tools, and trays a wipe-down once every week. Use a small microfibre cloth and a 3% hydrogen peroxide solution and wipe down all of these surfaces to kill off any lingering pathogens. Pay special attention to any tools that you might have brought in from the garden and forgotten to clean—these are potential vectors of fungal and bacterial transmission.
Hydro growers sometimes fall into the trap of thinking a lack of soil means no pests or diseases. However, bacteria and mould can still grow within tubes and reservoirs, and some species really value the dampness. Drain, clean, and sterilise your system with a diluted bleach solution once per week to prevent mould and algae from establishing a foothold.
If you decide to invest in an air-filtration system, you’ll need to check it weekly to ensure things are running correctly. Look out for any signs of wear and tear that might allow spores, bacteria, and pests to bypass your filter and enter the growing space. Replace your filters if you detect any entry points, or when they pass their capacity (usually between 6–12 months).
Check behind the reflective surfaces on your tent walls. These areas can trap stagnant air and humidity, and serve as a breeding ground for mould. If you find any funky fungi, wipe them down with hydrogen peroxide. You can also wipe these surfaces down weekly as a preventive measure, even if you find them "clean" at the time.

Now that you have your daily and weekly cleaning lists compiled, add the following few tasks to your monthly schedule. Although you don’t need to carry these out too frequently, they are still important enough to set aside time for each month.
Many indoor growers neglect their lights when cleaning their grow space. However, light covers, bulbs, and even strings can collect dust and serve as potential hiding places for spores and mites. Dismantle them once a month, during the “off” cycle, and give them a thorough wiping.
Inspect ducts and filters. Use a microfibre cloth or small vacuum to remove dust and debris. Change out any filters that have passed their service period according to product directions.
Take time to carefully inspect unseen areas that can harbour dust and mould. Run a microfibre cloth along seams, zippers, and poles to eliminate any hidden grime.
By carrying out your daily and weekly chores, you’ll likely go over every surface, tool, tray, and inch of the floor. However, by setting aside a couple of hours each month, you can make it a habit to sterilise absolutely everything. This way, if you missed anything during your other checks, you’ll hit it during this intentionally thorough monthly session.
During your “sterilise everything” session, it helps to have a list together to make sure you hit everything. This way, no single spore, bacterial cell, or insect egg stands a chance.
Start from the ceiling and work your way down to the floor. If you start low and work high, you’ll only knock down debris and particles onto an already clean floor.
Begin by dusting the ceiling, then the walls, and then sweep the floor. After dusting, use bleach or hydrogen peroxide to wipe out anything left over. Start from the ceiling and proceed in the same order as before.
In order to remedy any problems, you need to know what you’re up against. Use an identification guide to help you know your enemy and take the correct measures.
Check out some of the most common pests and pathogens, and their remedies (including beneficial insects and companion plants) below:

You’ve learned how to keep your grow tent clean under normal circumstances. However, you’ll need to take things a step further if you encounter mould or pest infestations. Check out the following steps to reclaim your grow tent!
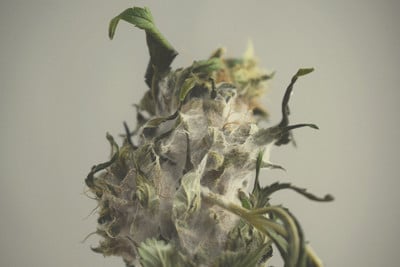
Before taking action, determine whether you are dealing with powdery mildew, spider mites, mould, or another issue. Each problem requires a targeted approach.
For example, powdery mildew presents as white, powder-like spots on leaves, while spider mites leave fine webbing and tiny specks. Identifying the issue ensures effective treatment.
Remove infected plants from the grow tent immediately to prevent further contamination. Place them in sealed bags before disposal to avoid spreading pests or spores. Inspect remaining plants carefully for signs of infestation, and consider treating them with neem oil or another natural pesticide.
After a pest or mould infestation, use stronger disinfectants like a bleach-water solution or a hydrogen peroxide spray. Wipe down all surfaces, including tent walls, floors, and equipment. Allow the solution to sit for several minutes before rinsing and drying completely.
Enhance ventilation to prevent future infestations. Use oscillating fans to improve air circulation, a dehumidifier to maintain optimal humidity levels, and HEPA filters to remove airborne spores and pests. Keeping humidity between 40–60% discourages mould growth and pest infestations.
Always quarantine new plants and clones for at least a week before placing them in your grow tent. Inspect them daily for signs of pests or disease. This precaution prevents introducing new threats into your clean grow space.
You know what to do when cleaning your cannabis grow tent. Now, learn not what to do:
Congratulations, you’ve just learned absolutely everything you need to know to keep your cannabis grow tent clean! Using these methods, you won’t just keep your tent free of dust and grime, but you’ll also prevent yield-reducing pests and diseases, too.
Remember, make an effort to keep a consistent clean schedule, splitting up tasks into daily, weekly, and monthly sessions for the best results. Use a combination of disinfectants and cleaning tools to keep your tent spotless, and adjust your approach depending on whether you’re dealing with a new or used grow tent.
Finally, remember to deploy sticky traps and predatory insects to prevent problems before they emerge. Staying on top of humidity management also pays big dividends.
Although it takes a bit of work, you’ll save yourself some big issues and plant losses by putting these tips into practice.